Pages
▼
Monday, July 28, 2014
Scalloped Hoop Earrings DIY TUTORIAL
The scalloped edge has been popping up everywhere in clothing and accessories. I love the feminine, flirty and sweet feeling that this detail adds to anything. It's easy to incorporate the trend with a pair of easy beaded hoops!
Supplies:
54 size 8 seed beads
1 pair of silver-plated 25mm beading hoops
36" of gold-plated 24 gauge wire
Tools:
Chain nose pliers
Wire cutters
1: Use 18" of 24 gauge wire to tightly wrap 1 hoop three times, beginning at the hole side.
2: Bring the wire to the top of the hoop and string 3 seed beads. Hold the beads at the top of the hoop and wrap the wire three times around the hoop as shown. Repeat 8 times.
3: Using chain nose pliers, make a 90 degree bend in the hoop about 1/8" from the end.
4: Repeat steps 1-3 to make the second earring.
Enjoy your new, pretty earrings!
Wednesday, July 16, 2014
Confetti Hoop Earrings DIY TUTORIAL
Make a statement with these playful earrings! You’ll be ready for the beach, a Summer BBQ or an outdoor concert in these fun, colorful hoops.
Confetti Hoop Earrings
Erin Siegel
Ingredients:
36 magatama 4 opaque mix seed beads
2 gold plated 2” hoop earrings
72” of gold plated 24 gauge wire
Tools:
Chain nose pliers
Round nose pliers
Cutters
Ruler
1: Use 36” of wire to tightly wrap 1 hoop for 1”, beginning at the hole side as shown.
2: Grasp the hoop with round nose pliers and bend the wire over the pliers, creating a loop as shown.
3: Use the wire to string one bead and wrap the wire three times around the hoop as shown. Repeat 17 more times. Wrap the wire around the hoop for 1” as in step 1 and trim.
4: Use chain nose pliers to make a 90 degree bend in the hoop about 1/8” from the end as shown.
5: Repeat steps 1-4 to make the second earring.
Enjoy your new earrings! The technique to make these is quite versatile. You can easily change up the look and feel of your earrings by switching out the beads used and the size of the hoop or earring findings. Make a bunch of these and have some fun this Summer!
Happy Creating,
Erin
Friday, July 11, 2014
Nautical Notions
I've always loved the ocean, the beach, seafaring towns, life and culture. I'm lucky enough to live near the ocean on the New England coastline. So, naturally, I just adore nautical themes for jewelry, fashion and home decor. When Spring and Summer roll around, these themes are always in style and all year round as far as I'm concerned!
It's easy to add a little maritime touch to your Summer look. Try one of my DIY jewelry projects. These are fun, easy to make and stylish for the season. Click the pic or the link to go to the tutorials.
Looking for more nautical inspiration? Check out my Pinterest board below!
Happy Creating,
Erin
Wednesday, July 9, 2014
Micro-Macrame Bracelet Class
Micro-Macrame Flower Bracelet Class - $45
Date: Sunday, July 13th 2014
Time: 1:00pm -4:00pm
Place: RiverWalk Gallery and Healing Arts 32 Elm Street in Amesbury, Ma.
Level: All
Kit Fee: $15 (includes all materials needed)
Class Description:
Learn classic macrame techniques to make this adorable flower motif bracelet perfect for everyday wear. Knotting techniques covered in class will include: Lark's head knot, square knot, overhand knot and slip knot. Using Irish waxed linen cord, you will learn how to tie colorful gemstone rounds and accent beads into a pretty flower pattern. You will also learn how to connect your cord to a metal clasp using a slip knot. Finish your bracelet off with an adjustable chain extender, wire-wrapped bead dangles and a sweet flower charm. Project kits will be available with an assortment of gemstones and cord color prepackaged for a fee of $15. Macrame boards will be available for sale as well.
Tool List: There are tools available for you to use at the shop, but if you have them, please bring:
ruler
scissors
macrame board and T-pin or office clipboard
round nose pliers
pair of chain nose pliers
wire cutters
Hope to see you there this Sunday!
To learn more about the River Walk Gallery, you can read my post about it here or visit their website or visit them on Facebook.
Date: Sunday, July 13th 2014
Time: 1:00pm -4:00pm
Place: RiverWalk Gallery and Healing Arts 32 Elm Street in Amesbury, Ma.
Level: All
Kit Fee: $15 (includes all materials needed)
Class Description:
Learn classic macrame techniques to make this adorable flower motif bracelet perfect for everyday wear. Knotting techniques covered in class will include: Lark's head knot, square knot, overhand knot and slip knot. Using Irish waxed linen cord, you will learn how to tie colorful gemstone rounds and accent beads into a pretty flower pattern. You will also learn how to connect your cord to a metal clasp using a slip knot. Finish your bracelet off with an adjustable chain extender, wire-wrapped bead dangles and a sweet flower charm. Project kits will be available with an assortment of gemstones and cord color prepackaged for a fee of $15. Macrame boards will be available for sale as well.
Tool List: There are tools available for you to use at the shop, but if you have them, please bring:
ruler
scissors
macrame board and T-pin or office clipboard
round nose pliers
pair of chain nose pliers
wire cutters
Hope to see you there this Sunday!
Thursday, July 3, 2014
Neon Pop Tassel Necklace DIY TUTORIAL
Get ready for Summer in the City! Pair this long swingy necklace with a white or grey T-shirt and jeans or cut-offs for an easy, urban downtown boho vibe.
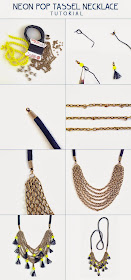
Ingredients:
Tools:
Chain nose pliers
Knotting tweezers
Scissors
Ruler
1: Remove all the cord from
the card and stretch. Tie a double overhand knot at the end of the cord
opposite the needle as shown. String 1 knot cup and close. String 1 neon pearl
and tie an overhand knot using the tweezers as shown. Trim cord to ½” from the
knot and fray the ends as shown. Repeat 11 more times for a total of 12 tassel
dangles.
2: Insert one end of the
leather lace into one fold over end and close with chain nose pliers as shown.
Repeat for the other end. Set aside.
3: Separate the chain into
(1) 5” piece, (1) 5 ½” piece, (1) 6” piece, (1) 6 ½” piece, (1) 7” piece, (1) 7
½” piece and (1) 8” piece.
4: Using the 5” length of
chain, count 12 links from one side and attach 1 oval jump ring to the 12th
link. Attach 1 oval jump ring 1” from the previous jump ring. Repeat once more.
Set aside. Using the 6 ½” length of chain, attach 1 oval jump ring 1” from the
end. Attach 1 oval jump ring 1 ½” from the previous jump ring. Repeat twice.
Set aside. Using the 8” length of chain, attach 1 oval jump ring to the second
link from the end. Attach 1 oval jump ring 2” from the previous jump ring.
Repeat 3 times.
5: Use one 7mm round jump
ring to string one end of all the chains from longest to shortest. Close jump
ring. Repeat using the other end of the chains as shown.
6: Use 1 oval jump ring to
attach one 7mm round jump ring to the loop of 1 fold over end as shown. Repeat
for the other side of the necklace.
7: Attach the tassel dangles
to the oval jump rings on the chains as shown.
Enjoy wearing your new Summer necklace. Happy 4th of July weekend, everyone!
Happy creating,
Erin