Thursday, May 29, 2014

Introducing Punk Chic Jewelry

http://www.amazon.com/dp/B00KIWTRYK/ref=pe_385040_118058080_TE_M1T1DP

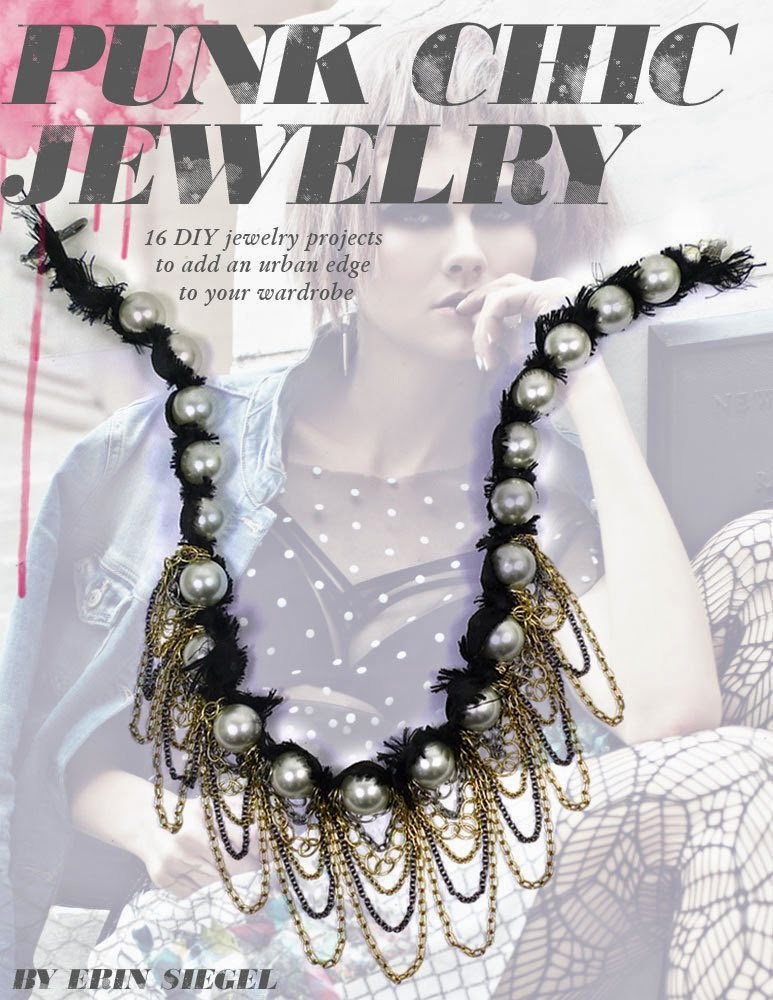
With lots of help from Ornamentea, I've authored my first e-book! I'm extremely excited to present to you, Punk Chic Jewelry: 16 DIY Jewelry Projects to Add an Urban Edge to Your Wardrobe. The book is available on Amazon.com as a kindle edition e-book. Anybody can read kindle books, even without a kindle device. Simply download the FREE kindle reading app for your PC, Mac, laptop, tablet or smartphone. Just look for the Kindle Reading App on the right sidebar of the Amazon book page. I don't have a kindle and I downloaded the app, myself. It was quick and easy! 


These are 3 projects from the book. I'm just giddy to tell you that Ornamentea has created Limited Edition Punk Chic Kits for ALL the jewelry projects in the book! Whooo Hooo! How cool is that? Click here to see all the projects and all the kits!

I had an absolute blast coming up with jewelry projects for this book. It was such a thrill to explore the design style of “Punk Chic” and how I wanted to interpenetrate it. Punk is an exciting, hard-edged genre of fashion that I felt drawn to create around. That’s interesting because I would consider punk to be a little outside my comfort zone. I think that’s exactly why I find it so intriguing! The projects you’ll find here are the result of a personal journey. I pushed myself just a little. I challenged myself to design something against the norm and outside my usual aesthetic, while still being relevant and fashion-forward.

Modern punk fashion or “Punk Couture” is a mix of anarchy and glamour, a more grown-up version of old-school punk. I created jewelry that is street cool yet sophisticated , edgy yet elegant, tough yet pretty and sassy yet playful. I adore every piece. In fact, I can’t wait to order more supplies from Ornamentea.com, recreate each piece for myself and add them to my own collection of jewelry to wear all the time. With a palette of shimmering gold and silver tones, mixed metals, black, white and neutrals, the jewelry pieces in this book are versatile. They’ll go with anything in my wardrobe and they mix and match well with each other. Most importantly though, these projects are easy and fun to create and the finished jewelry makes me feel hip, happening and oh-so-chic when I wear it!

I’d like to thank Cynthia Deis, Queen Bee of Ornamentea for believing in me and my ideas. Because of her, I’m able to design whatever I want from Ornamentea’s vast inventory of supplies and materials. Cynthia makes it easy for me to create fun, fashionable DIY jewelry projects. I love designing for her. I’m proud to consider myself a member of the big O family. I look forward to our journey ahead and continuing this wonderful partnership. Click here to read Cynthia's blog post about our journey to creating this book! I’d also like to thank Caitlin Palmieri. My tutorials for Ornamentea and this book would not be possible without her. She works graphic magic! Her eye for style and design are right on point.

Last, but not least, I'd like to thank you, the reader of this book. Without you, none of us would be here doing this. Thank you for your interest in this work and for your support. I appreciate you more than you know. I hope you enjoy the projects in this book as much as I did creating them for you (and me).

 Need some inspiration for Punk Chic Style? Follow our board on Pinterest!


Wednesday, May 28, 2014

Stacked Bracelets and Jewelry Stringing Summer 2014

Ever since my friend, Tracy Statler issued her Wrapped, Stacked and Layered Bracelet challenge back in 2012, I've been kinda obsessed with the arm party. I know I'm not alone! The popular trend is still going strong with no signs of fading out anytime soon. One reason for that I think is no matter what your fashion sensibilities are, there's a bash of bracelets to match it. It's become another way to express ourselves and show our style even when wearing a simple outfit.

Recently, I was inspired to share some of my bracelet collections on Instgram and Facebook. Others seemed to enjoy them, so I thought I'd share them with you here.
  I hope I can inspire you to put together some of your own bracelet stacks.

http://www.interweavestore.com/stringing-summer-2014-digital-edition
And speaking of making your own bracelet stack, I'm proud to have my "Leather Couture" bracelet project published in the Summer 2014 issue of Jewelry Stringing magazine! Find a full materials list and instructions to DIY my edgy, but glam bracelets. The new issue features a whole section of "Stylish Stackables" you can make yourself. Pick up a digital copy to start creating your own arm party today, as well as plenty of other cool jewelry projects, too.

http://www.interweavestore.com/stringing-summer-2014-digital-edition
 Leather Couture
Bracelet stack set in the "Stylish Stackables" section
 All supplies and materials to make these bracelets from Ornamentea.com!
 If you are looking for more inspiration...

 Follow my Bracelet Stacks Board on Pinterest!


Tuesday, May 27, 2014

Book Signing and "Spice Trader" Macrame Bracelet Class


http://www.interweavestore.com/bohemian-inspired-jewelry

Hello all! I'm participating in my local Salem Arts Festival this year. The festivities have a "Fire and Spice" theme. I'll be doing a book signing for my jewelry-making book, Bohemian-Inspired Jewelry: 50 Designs Using Leather, Ribbon, and Cords at Boston Bead Company in Salem, Ma. on Friday, June 6th, 2014 from 6:30 pm - 7:30 pm. Please come by and say hi and enjoy some spicy refreshments while we chat. I'd love to meet you!


http://www.bostonbeadcompany.com/collections/project-classes/products/spice-trader-macrame-bracelet-by-erin-siegel

 Then, on Sunday, June 8th 2014 from 10:30 am - 1:00 pm at Boston Bead Company in Salem, I'll be offering my "Spice Trader" Triple Row Macrame Bracelet class.
 Description: Learn to make a unique 3-row, square knot macrame bracelet with Irish waxed linen cord, colorful glass rounds and metal beads. Finish off your bracelet in spicy style with a loop/button closure and a beaded tassel!

Register for class online at: www.bostonbeadcompany.com.

If you are local or in the Boston area, please join me for these events. Hope to see you there!


https://www.facebook.com/pages/Bohemian-Inspired-Jewelry-50-Designs-Using-Leather-Ribbon-and-Cords/782200328459804
Bohemian-Inspired Jewelry now has a FaceBook page. Click here to Like us on FaceBook!

Saturday, May 24, 2014

Waxed Linen Jewelry, Tutorials and Giveaway!

Spools of Irish Waxed Linen Cord
 
Hello and Welcome. Stay tuned for a waxed linen jewelry giveaway at the end of this post! Today, I'm sharing with you one of my favorite materials for jewelry-making - Irish waxed linen cord. I first discovered waxed linen about 7 years ago and I've been using it in my jewelry ever since. The more I use it, the more I fall in love with it. Waxed linen cord is a strong, durable and versatile material that works great for knotting, braiding and bead stringing. It's made up of fine threads twisted together that's referred to as "ply". The waxy coating on the cord helps make well-defined, crisp knots and holds them in place without the need for glue.The highest quality cord is Irish waxed linen cord made by Crawford Threads in Belfast, Ireland. I like to buy my waxed linen wholesale by the spool from royalwoodltd.com. You can also purchase it by the yard or the spool at ornamentea.com or jewelryaccord.etsy.com, which also offers cord color palettes. The color mixes offer wonderful inspiration to start your jewelry designs. Below is a bracelet tutorial I created for the Jewelry Accord shop on Etsy using one of Lorelei's many color cord palettes:

Fortuneteller's Bracelet

Waxed linen has traditionally been used for book-making and basket-weaving, but it's become quite popular for jewelry-making in recent years. Jewelry designers are drawn to the variety of beautiful colors it comes in, it's affordability, as well as it's strength and durability. Waxed linen comes in different plies or thicknesses. I use a 4-ply cord in most of my jewelry. A single strand of 4-ply will string through most beads. I tend to like to use multiple strands in my designs. More strands gives me more design options when I'm making jewelry and I also love the texture and fullness I get with multiple strands.

Tribal-Inspired Beaded Bracelet
I want to show you the range and versatility that waxed linen can provide in your jewelry designs. You can get a lot of mileage out of the cord if you let it provide multiple elements in your pieces. Use waxed linen to it's fullest potential by using it as your stringing material, using it to add color, using it to add texture and using it as part of your clasp all in one piece, like in my Tribal-Inspired Beaded Bracelet above or the Fortuneteller's Bracelet above that. If you look carefully at each piece, you can see that the linen cord is: the stringing material, adding color, adding texture and part of the clasp element.

Although I didn't make any new jewelry for the hop, I have plenty of designs I've done in the past to show you and this isn't even every piece! I have broken up my collection into 3 categories: Modern Brights, Earthy Bohemian and Feminine Romantic.  

Which collection below is your favorite? I've provided links to tutorials for some or links to magazine issues where you can find the tutorials for others.

Modern Brights Collection

Feminine Romantic Collection

A special thank you to my friend, Diana of Suburban Girl Studio for hosting the waxed linen jewelry blog hop. I hope you have enjoyed viewing a variety of jewelry designs created with waxed linen. Now, it's time for my waxed linen jewelry GIVEAWAY!

Win your choice of a digital copy of a waxed linen jewelry-making tutorial from my Etsy shop: Bohemian Knotted Earrings, Macrame Flower Bracelet or Triple Row Macrame Bracelet.

https://www.etsy.com/shop/ErinSiegelJewelry?ref=si_shop

Or win your choice of a waxed linen bracelet kit from Ornamentea.com: Knotted Friendship Bracelets or Silver Branches Bracelet.

http://store.ornamentea.com/store/category/14/93/Jewelry-Kits/

Which jewelry collection from above appeals to you most? Modern Brights, Earthy Bohemian or Feminine Romantic?

Leave a comment answering this question and you will be entered for a chance to win a digital copy of one of my waxed linen jewelry tutorials OR a waxed linen bracelet-making kit!

Leave your comment by Sunday, June 1st to be entered into the giveaway and please leave a way for me to contact you, if you win.

Saturday, May 17, 2014

Color Me Happy Necklace/Wrap DIY TUTORIAL

Hello! I'm extremely excited about this new jewelry tutorial designed for Happy Mango Beads. It's a necklace, it's a wrap bracelet and it's the perfect accessory for Summer. The beads and materials for the project are inexpensive, but the quality is wonderful. I'm very impressed with the beads I received from Happy Mango Beads. I'll be back for more, no doubt.

This jewelry piece is colorful, versatile and lots of fun. It just makes me feel all happy-sunshiny-day. :) I want to jump up and shout Woooo Hooo! I love color and I love Summertime. If this project doesn't scream happiness for love, life and beads, I don't know what does. Enjoy.


Color Me Happy Necklace/Wrap
by Erin Siegel, designed for Happy Mango Beads

This fun, versatile piece can be worn as a necklace or wrap bracelet.

Materials:

Tools:
Chain nose pliers
Scissors
Ruler

Finished size: 31” adjustable to 32”

1: Cut the leather in half. Use both cords to form an overhand knot about ½” from the ends. Trim cord ¼” from the knot as shown.
2: Use both cords to string the disc bead. Use both cords to form an overhand knot ½” from the previous knot as shown.
3: Use one cord to string 3 brass beads and 3 orange wood rounds as shown. Repeat 7 more times. Repeat entire step using the yellow, pink and teal wood rounds. String 3 brass beads at the end.
4: Repeat step 3 using the other leather cord. String the wood rounds in the following order: Pink, teal, orange and yellow.
5: Use both cords to form an overhand knot after the beads. Form another overhand knot 1” from the previous knot as shown. Repeat once more.
6: Use one cord to string 3 brass beads and form an overhand knot. Trim cord to ¼”. Repeat entire step for the other cord as shown.
7: Use the jump ring to attach the heart charm to a section of brass beads as shown.

Resources:
Wood rounds, brass beads, charm and disc bead: Happy Mango Beads. All other supplies: Ornamentea
 Happy Beading!

Tuesday, May 6, 2014

Color Chain Collar Necklace DIY TUTORIAL


Spring into fashion with electrifying hues of the season. Fun won’t be far behind wearing this cool collar necklace!

http://www.ornamentea.com/TheShop/TutorialPages/ColorChainCollarNecklace.html

Ingredients:

Tools:
Chain nose pliers
Cutters
Ruler

1: Cut the yellow chain into two 5” pieces and two 3” pieces. Cut the orange chain into two 4 ½” pieces and two 2 ½” pieces. Cut the pink chain into two 4” pieces and two 2” pieces. Cut the green chain into two 3 ½” pieces. Attach one 5mm jump ring to each end of each chain.
2: Use the 14mm jump ring to string one end of 1 yellow 5” chain, 1 orange 4 ½” chain, 1 pink 4” chain, 1 green 3 ½” chain, 1 yellow 3” chain, 1 orange 2 ½” chain and 1 pink 2” chain. Repeat entire step using the 11mm jump ring and the other end of the chains as shown.
3: Repeat step 2 for the other side of the necklace as shown.
4: Cut the leather into four 5” pieces. Insert 2 ends of leather into 1 fold over end and close as shown. Repeat for all remaining leather ends.
5: Use one 5mm jump ring to attach one fold over end to one 11 mm jump ring as shown. Repeat for the other side of the necklace.
6: Attach the spring clasp to 1 free fold over end. Attach the 7mm jump ring to the other fold over end as shown.

Enjoy wearing your new, colorful necklace!