Next weekend I'm taking my 2 1/2 year old daughter to her first Native American Pow Wow. I hope she enjoys the flute music, drumming, dancing, storytelling and crafts. She's already familiar with dream catchers. Before she was born, I was gifted a beautiful dream catcher handmade by a Native American woman I know. It hangs above her bed now.
As long as I can remember, I’ve always
been fascinated by the Native American culture. From their deep respect
and reverence for nature, to their great spiritual teachings, to their
beautiful handcrafts and beadwork. One Native American tradition I have
always loved and gravitated towards is the dream catcher.
Today,
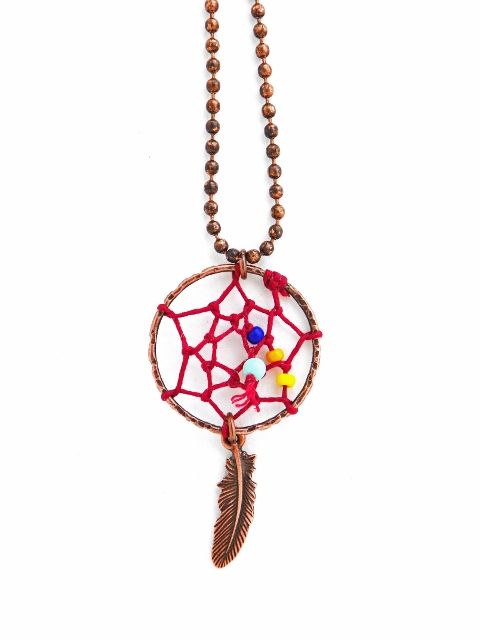
I’m going to be sharing with you how to make your own dream
catcher-inspired pendant to capture the dreams, goals and positivity you
want to bring into your life! You will learn the traditional weave to
make the web of the dream catcher, then you can embellish your pendant
with a variety of beads, feathers and/or charms to represent those
dreams, hopes and wishes you want to catch. The finished pendant can be worn on it's own or you can incorporate it into your own beaded jewelry design. The act of making this
pendant is a hands-on, creative way to realize your dreams, while making
a keepsake with special meaning that you can wear and keep as a
reminder of the things that are important to you. But, before I get into
showing you how to make your pendant, I want to share with you a little
bit about the origins of the dream catcher and a Native American dream
catcher legend. I hope you will find this to be fun, informative and
inspiring!
Origins of the Dream Catcher:
The
Ojibaway or Chippewa were the first to design these decorations to
protect their babies against bad dreams that might come along in the
night. Both good and bad dreams would be caught by the web, but only
good dreams could find their way through the hole and slide down the
feather to the baby’s head. The bad dreams, not knowing the way, would
get caught in the web and dissipate with the first rays of morning
light.
Since the beginning, many Native American tribes
have adopted the dream catcher and incorporated it into their heritage.
The Lakota are one such group that have done this. The following is
their story of the dream catcher:
Legend of the Dream Catcher (Lakota)
Long
ago an old spiritual leader was high on a mountain and had a vision. A
teacher of wisdom appeared in the form of a spider. The spider picked up
the elder’s willow hoop and began to spin a web. She spoke to the elder
about the cycles of life. She said, “In each time of life there are
many forces, some positive and some negative. If you listen to the
positive forces, they will steer you in the right direction. If you
listen to the negative forces, they will lead you astray.”
When
the spider finished speaking, she gave the elder the web and said. “The
web is a perfect circle with a hole in the center. Use the web to help
your people reach their goals, making good use of their ideas, dreams
and visions. If you believe in the Great Spirit, the web will catch your
good ideas, let them float through the hole and down the feather upon
you.” The elder passed on the vision to the people. Now, many hang a
dream catcher above their bed to sift their dreams and visions. The good
thoughts are captured in the web of life and dropped down to the
person, the negative thoughts are caught in the web and perish at
daybreak, never to be a part of their lives.
Now, I
don’t know about you, but I would really like to adopt this concept!
Who’s with me? Okay, let’s make some dream catcher pendants to wear to
catch those good dreams from the air, let them float down into our
hearts!
Materials needed:
1 metal 25mm ring
1 gemstone 4mm round
3 size 8 seed beads in assorted colors
1 feather charm
2 metal 4mm jump rings
18” of 4ply Irish waxed linen cord (color of your choice)
A kit containing all the materials needed and instructions can be found in my Etsy shop here.
Tools:
Scissors
A pair of chain nose pliers (to attach the jump rings)
Instructions:
1. Use the cord to make a 1” fold at one end. Use the folded end to form a lark’s head knot around the copper ring as shown in photo 1.
2. Using the long end of the cord, form a half-hitch knot around the copper ring and the 1” tail as shown in photo 2.
3. Trim the tail. Pull the cord down so that it sits on the inside of the copper ring as shown in photo3.
4. Bring the cord around the copper ring and through the loop as shown in photo 4. This is called looping. Continue making loops around the ring 5 more times. Add seed beads as desired.
5. Bring the cord around the first loop created in step 4 and through the loop as shown in photo 5.
6. Continue looping in the same matter adding seed beads as shown in photo 6. Loop around the inner diameter of the ring twice.
7. Use the cord to string one 4mm bead; tie and overhand knot and trim cord as shown in photo 7.
8. Use 1 jump ring to attach a feather charm to the pendant. Use another jump ring to attach a chain or necklace cord to the pendant and enjoy!


.jpg)
.jpg)
.jpg)
.jpg)
.jpg)
.jpg)




.jpg)
.jpg)
.jpg)
.jpg)
.jpg)
.jpg)
